今天看啥  ›  专栏  ›  Friends of the wind

玩转Linux系统之网络安全部署

Friends of the wind  · CSDN  ·  · 2020-01-01 00:00

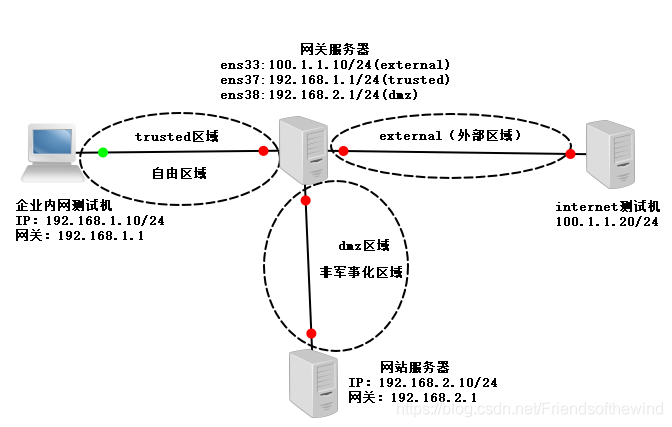
拓扑图

在这里插入图片描述

提示:通过需求分析要求(要我们做什么技术操作)。

需求(最终效果):

  1. 企业内部测试机可以访问网站服务器httpd服务
  2. 企业内部测试机可以通过SSH远程管理网站服务器
  3. Internet测试机可以通过SSH远程管理网关服务器

要求(需要做什么技术操作):

  1. 网站服务器和网关服务器均通过SSH远程管理,将SSH默认端口修改为12345
  2. 网站服务器开启https,过滤未加密得http流量,拒绝ping请求。

一、企业内网测试机(centos7) Internet测试机(win10)

提示:如果虚拟机环境,所有网卡类型必须一致,都是V1或V8
例如:
1、编辑网卡
[root@localhost ~]# vim /etc/sysconfig/network-scripts/ifcfg-ens33
在这里插入图片描述
重启ens33网卡
[root@localhost ~]# ifdown ens33;ifup ens33
Internet测试机
在这里插入图片描述


二、网站服务器(centos7)

提示:可以有多种方式安装httpd,这里使用本地yum安装
1、 网卡配置

[root@localhost ~]# vim /etc/sysconfig/network-scripts/ifcfg-ens33
在这里插入图片描述
[root@localhost ~]# ifdown ens33;ifup ens33
2、 配置yum仓库
清空原有数据文件
在这里插入图片描述
创建新的数据文件
在这里插入图片描述
3、 yum安装httpd和mod_ssl
[root@localhost ~]# yum -y install httpd mod_ssl
启动httpd服务
[root@localhost ~]# systemctl start httpd

创建测试网站首页(加油!未来的比尔盖茨)
[root@localhost ~]# vim /var/www/html/index.html

添加以下内容:
在这里插入图片描述
重启服务
[root@localhost yum.repos.d]# systemctl restart httpd

4、更改SSH监听端口
[root@localhost ~]# vim /etc/ssh/sshd_config
在这里插入图片描述
[root@localhost ~]# setenforce 0 //关闭selinux
[root@localhost ~]# systemctl restart sshd //重启sshd服务
5、配置防火墙
① //启动防火墙
[root@localhost ~]# systemctl start firewalld
② //将ens33网卡添加到防火墙dmz区域
[root@localhost ~]# firewall-cmd --zone=dmz --add-interface=ens33
③//允许防火墙dmz区域通过https服务
[root@localhost ~]# firewall-cmd --zone=dmz --add-service=https
④//允许防火墙dmz区域通过tcp的12345端口
[root@localhost ~]# firewall-cmd --zone=dmz --add-port=12345/tcp
⑤//禁止来自dmz区域的ping请求
[root@localhost ~]# firewall-cmd --zone=dmz --add-icmp-block=echo-request
⑥//移除默认的22端口的ssh服务
[root@localhost ~]# firewall-cmd --zone=dmz --remove-service=ssh


三、网关服务器(centos7)

注意:加两块网卡,类型必须一致,例子使用V1复制的网卡信息,删除UUID号
例如:
1、 网卡配置
在这里插入图片描述
拷贝网卡信息
在这里插入图片描述
配置网卡信息

[root@localhost ~]# vim /etc/sysconfig/network-scripts/ifcfg-ens33
在这里插入图片描述
[root@localhost network-scripts]# vim ifcfg-ens37
在这里插入图片描述
[root@localhost network-scripts]# vim ifcfg-ens38
在这里插入图片描述
[root@localhost network-scripts]# systemctl restart network
2、开启路由转发功能
[root@localhost ~]# vim /etc/sysctl.conf
在这里插入图片描述
3、 更改ssh侦听端口
[root@localhost ~]# vim /etc/ssh/sshd_config
在这里插入图片描述
关闭selinux(关闭,否则安全策略可能会阻止)
[root@localhost ~]# setenforce 0
重启sshd服务(更改配置文件后重启服务,才能生效)
[root@localhost ~]# systemctl restart sshd
4、Firewalld防火墙配置
开启防火墙
[root@localhost ~]# systemctl start firewalld
将ens37网卡添加到trusted区域
[root@localhost ~]# firewall-cmd --zone=trusted --add-interface=ens37
将ens33网卡添加到external区域
[root@localhost ~]# firewall-cmd --zone=external --add-interface=ens33
将ens38网卡添加到dmz区域
[root@localhost ~]# firewall-cmd --zone=dmz --add-interface=ens38
允许external区域通过tcp的12345端口
[root@localhost ~]# firewall-cmd --zone=external --add-port=12345/tcp
移除external区域默认的22端口的ssh服务
[root@localhost ~]# firewall-cmd --zone=external --remove-service=ssh
禁止来自external区域的ping请求
[root@localhost ~]# firewall-cmd --zone=external --add-icmp-block=echo-request

验证

企业内部测试机

  1. 企业内部测试机可以访问网站服务器httpd服务
    注意:网址要加上https(不加默认使用http访问)
    选择高级
    在这里插入图片描述
    添加例外
    在这里插入图片描述
    确认安全
    在这里插入图片描述
    即可看到,创建的网页
    在这里插入图片描述
  2. 企业内网测试机不能ping通网站服务器
    在这里插入图片描述
  3. 企业内部测试机可以通过SSH远程管理网站服务器
    在这里插入图片描述
    Internet测试机
    ssh远程管理网关服务器
    在这里插入图片描述
    输入root用户、密码即可登录成功
    在这里插入图片描述
    不能ping网关服务器
    在这里插入图片描述

报错处理:

1)无法重启网卡服务
在这里插入图片描述
查看所有网卡信息
在这里插入图片描述
发现问题:忘记添加网卡(注意不一定每次都会一下就找到问题,要不断缩小错误范围,最后定位原因)
解决方案:添加网卡ens37、ens38重启正常,不同电脑添加的网卡名称不一样,也可能是ens36、ens37等等,可先用命令查看,再配置的时候用对正确的名称。
2)防止报错,我们能做些什么?
这个项目,关于安全的肯定受到安全策略影响,将其设为宽容模式,命令setenfore 0
防火墙一定要配置正确,且要注意有些操作的先后顺序,上图错误,我虽然再次添加网卡,但是搞乱顺序,防火墙已经将规则写进错误的配置环境,改了也不行,得重新恢复此这个服务器快照。
按照标准化流程走,就不易出错,出错也很方便排错。


原文地址:访问原文地址
快照地址: 访问文章快照